So you are trying to replace or upgrade your bathroom’s shower arm? Did you find any reliable source to help you with this? No? Then stay tuned and let us help you on the topic – how to change shower arm in wall. In this article, we will discuss the tips related to changing the shower arm extension, the problems you may encounter, and the things you need to avoid while changing a shower arm. If you are about to change a shower arm, then we suggest going through this article at least once.
What Is a Shower Arm?
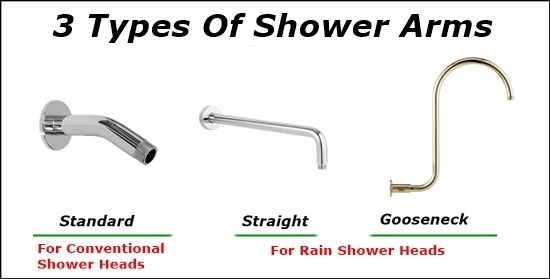
A shower arm is a pipe that connects the shower head to the water pipe behind the bathroom wall. It comes in different lengths, sizes, and materials like brass or stainless steel. A shower arm has three variants – standard, straight, and gooseneck. The standard type is suitable for conventional shower heads while straight and gooseneck variants are suited to rain shower heads having increased height.
How to Change Shower Arm?
Changing the wall shower arm is no big deal. Most shower arm replacement procedures take 15 minutes or less. People often neglect the prerequisites which are necessary to get started. That’s why they later spend more time on accidental damages caused by their negligence. So, we request you read the instructions carefully before changing your wall shower arm.
Things You’ll Need to Begin
Before changing the shower arm extension, you need to gather some tools. The list of tools is as follows.
- Teflon tape (also known as plumber’s tape).
- Small pipe wrench or adjustable slip joint plier.
- A clean piece of cotton cloth.
- Penetrating oil (WD-40)
- Rubber O-rings if supported (optional).
- A pair of rubber gloves for your safety.
- Plastic hammer for loosening joints.
Now after collecting the tools, move on to the step-by-step guide below.
How to Install the Shower Arm: Step-by-Step Guide
At this point, we believe you have read all the instructions given above in this post. So, let us start with the tutorial- how to change shower arm? This tutorial can be used for standard, straight, and gooseneck-type shower arms.
- Step 1: Cut the bathroom’s water supply first.
- Step 2: Wear rubber gloves and spray a little amount of the penetrating oil (WD 40) on the threaded joints of the shower arm. One joint is in the wall pipe, and the other goes to the shower head. Wait for 5 minutes after spraying the oil.
- Step 3: Firstly, carefully unscrew the shower head using the wrench or slip joint plier. Do not apply much force if the joint is tight because it may have limescale inside it. If the shower head fails to unscrew, then use a plastic hammer to gently hit the joint. As a result, limescale layers break, and it becomes easy to remove the shower head.
- Step 4: Put the shower head in a safe place and repeat step 2 for the other end of the shower arm pipe to remove it from the wall pipe.
- Step 5: Get the new wall shower arm and apply teflon tape on both its threaded ends in a clockwise direction. 6-8 turns of teflon tape are more than enough on each threaded end.
- Step 6: After applying the tape, screw the shower arm to the wall pipe first. If it supports O-rings, then fix them in place before installing them. Do not over-tighten the joint.
- Step 7: Install the shower head on the other end of the shower arm. If the shower head requires cleaning, then clean it thoroughly before installation using a mild bathroom cleaner.
- Step 8: Adjust the angle of the shower head. It should not lean to either side and always face down straight.
- Step 9: Resume the water supply and check for leaks at both ends of the shower arm.
Important Tips to Consider
This section lists several tips which ensure great success while changing a shower arm. These tips will also help you prevent damage to wall pipes, shower heads, and the shower arm.
- Always use penetrating oil because you don’t know if corrosion is there or not in the shower head threads. The oil loosens the joint and saves the pipe threads from damage.
- Before using the wrench or slip joint pliers, wrap a clean cotton cloth around the shower arm pipe to avoid damage to the chrome finish.
- Don’t wrap more than 6-8 turns of the teflon tape around the threads. More than the recommended turns make the male joint thick. This thick male joint may break the female joint in the wall pipe and shower head. Please avoid this at every cost.
Conclusion
Shower arms require replacements regularly, so it is always better to keep a check on their physical condition. Because of corrosion and limescale build-up, the shower arm slowly gets damaged. Corrosion damages the pipe threads that increases your replacement cost. So, to avoid such situations, you just need to buy a new shower arm, like 400mm Square Wall Mounted Shower Arm Chrome on MyHomeware and use our installation tips to change shower arm extension, wall shower arm, and learn how to remove shower arm. Our tutorial will definitely help you by saving you money and time.
FAQs about How to Change Shower Arm
No! Bathroom shower arms do not come in a universal size. Different shower arms have variable pipe diameters and lengths that may not comply with your existing shower head fitting. So, you need to be careful while ordering a replacement.
No! Shower arms do not contain any parts that you can repair. They are just a single pipe with threads. If threads get damaged due to corrosion, then repairing them is not worth it. Even if you try to repair them with a thread cutting machine, then you have to cut the length short to make new threads. So, repairing them is not a good idea. It is always better to look for the correct info on how to change shower arm, just like we presented in this post.
If you’re not considering quality, then you can get the replacement wall shower arm for as low as $20. But, a good quality shower arm may cost anywhere between $40-$100. This cost doesn’t include the plumber’s fee.
No! Brass is not the best when compared to stainless steel. Brass is good because it doesn’t attract corrosion and dirt and requires less maintenance if it is pure. But it is also more expensive than stainless steel shower arms. Poor brass metal contains high lead content. So, always prefer high-grade stainless steel shower arms.
No! They are not the same. A wall shower arm comes with a flange and makes a connection between the water pipe (behind the wall) and the shower head. We have already discussed the three types of wall shower arms at the start of this article. You can scroll up and see the first image for more details.
A shower arm extension is used to further extend the length of the existing shower arm. It sits between the shower head and the wall shower arm. If you’re looking for a detailed tutorial on how to install a shower head extension arm then first check our step-by-step guide for installing a shower arm by scrolling above. After that installing or connecting the extension to your newly installed shower arm would be a piece of cake.