The bathtub is the center of attraction in the bathroom. It not only gives you a comfortable bath but also adds to the beauty of your bathroom. If your bathtub is not freestanding, it may need a separate frame. Since such bathtubs do not have their base, they cannot remain stable. So in this article, we will see how to build a bathtub frame. So stay with us till the end of this article.

Why Do You Need To Build a Bathtub Frame?
Bathtubs are heavy objects and they need a solid frame to keep them firm if they don’t come with legs to support themselves. A frame ensures that the bathtub remains stable and doesn’t topple over when you use it. So let’s see what we need to prepare for building a bathtub frame below.
Preparation Before Building The Bathtub Frame
For this DIY on how to frame a bathtub, you’ll need the following tools.
- 4 inches long iron nails.
- A hammer.
- A saw to cut the wooden stubs.
- A pencil or a marker.
- A spirit level.
- Several metal fasteners.
- A drilling machine for drilling holes in the bathroom walls and concrete floor.
- Wood primer and base paint.
- Bathroom sealant.
- Wooden stubs as per the dimensions of your bathtub or a bathtub frame kit if available.
Step-By-Step Guide On How To Build a Bathtub Frame
After getting the right tools you’re all set to start building your bathtub frame. Here’s a step-by-step guide on the bathtub framing procedure.
- Place the bathtub against the walls and mark its height with a pencil or a marker.
- Measure the length and width of the bathtub.
- Cut four wooden stubs equal to the bathtub’s length.
- Now take two stubs and fix 2 to 4 vertical stubs between the two lengthy stubs with nails. It will look like a staircase. Make sure the height of this frame must be equal to the bathtub’s height. Close the ends with another two vertical stubs.
- Make the same frame for the other side too.
- Now connect these two frames breadth-wise with the help of horizontal stubs and install 2 to 3 vertical stubs of equal height for reinforcement. Check the frame with a spirit level to confirm that it is strictly parallel to the bathroom floor.
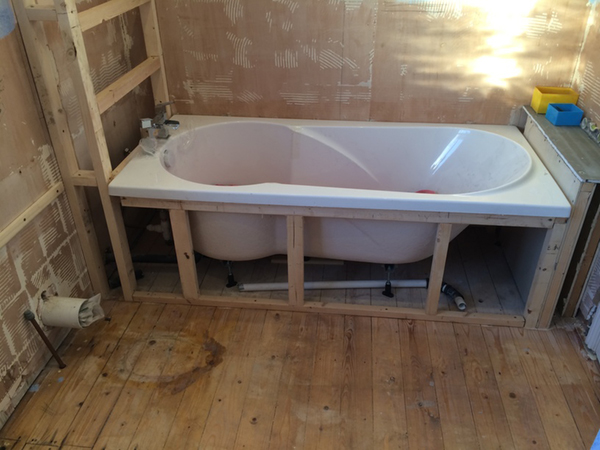
- You will get a wooden frame that looks like a hollow cuboid.
- Drill holes in the wall and bathroom floor and attach the frame to it with the help of metal fasteners.
- Check the frame, it should not be loose.
- After checking the frame for stability, start painting it to make it waterproof.
- When the paint dries, put your bathtub over the wooden frame and check for its stability.
- Fill the bathtub with water and sit or lie in it to see whether it shakes or not. If it remains stable then you have made the perfect frame.
- Caulk the bathtub’s and wooden frame’s edges with a sealant.
- Cover the frame as per your design ideas.
Tips And Warnings
While making the bathtub frame you must follow the tips and warnings discussed below. The same tips can be employed too if you are looking for info on how to frame a bathtub shower combo or how to build a bath frame for tiling.
- Never place the bathtub on an uneven surface. If your bathroom floor is uneven then use concrete to make an even base. Construct a rectangular concrete base with a thickness of around 4 inches. This will act as a foundation for your bathtub. This will take an entire day to dry. For the first 2 to 3 days keep watering the base to make it strong. After 2 to 3 days start with your bath frame construction.
- Remove the regular tiles from the walls up to the bathtub’s height. Replace them with acrylic tiles. Acrylic tiles are the number one choice for bathtub surrounds.
- Always install vertical stubs in the wooden frame so that it can bear the bathtub’s weight.
- Use all types of safety gear like gloves and eyeglasses.
- Use the drill machine and saw carefully. If you are using a circular saw then you have to be extra careful because circular saws may the hands and fingers.
- If your bathroom has water pipes behind the walls then avoid that particular place for drilling the holes.
Conclusion
Whether you’re renovating or building your bathroom from scratch, you’ll always need a frame for your bathtub if they are not freestanding bathtubs. So preparing them is a job that you should not skip. However, no tutorial on how to frame a bathtub may be 100 percent relevant to the size of your bathtub. But the basics of building a bathtub frame remain the same. So, use our tutorial on how to build a bathtub frame, we hope it will help you to achieve your bathroom renovation goal.
FAQ about How to Build a Bathtub Frame
Acrylic is the best choice for a bathtub surround. It’s an all-in-one package that’s durable, cost-effective, easy to clean, and easily matches your existing bathroom design. Another big advantage of choosing acrylic is that mold and mildew cannot grow on its surface.
Yes! A bathtub generally needs support at the base to evenly spread the force of the weight. Providing support to the base can also ensure that the bathtub does not sag or tilt, especially if it’s a heavy bathtub or may be used to support a large amount of weight. Mortar or concrete is often used at the base to support.
First, paint the wooden bath frame with good quality waterproof paint. Some paints leave a smooth rubbery finish when dry. This rubbery finish is highly repellent to water.
Start with a first coat of wood primer, then apply two coats of base paint.
Once the paint dries, cover the frame with PVC sheets and caulk the edges with silicone sealant.